Above are the frames and 1/4" plywood tops for the the main cabin hatches. These are forward sliding hatches that will cover inner coamings. Notice that the foreground ends are open to clear the coamings and that the tops will mate to the gently curving frame surfaces.
Above, the main hatch top has been installed and the exterior is covered with fiberglass fabric. A green filler compound has been applied and is sanded to create a smooth surface by removing minor imperfections. This repetitive process is known as fairing and will be applied to all the vessel's exterior surfaces. It is fair to predict a sanding filled future for me.
Resting on the hatch is a length of thin plywood with 60 grit sandpaper attached to the underside. This is known as a longboard or torture board by those who use them. The longboard averages out the surface to take down the high spots and helps reveal the low spots for the next round of faring. I have seen three men on one longboard fairing the surface of a larger vessel.
A collar was added near the main hatch open end after fairing. The open end will slide into a housing that seats against the collar face to help exclude water from the interior.
A groove is cut on the underside edge of the hatch's open end. The groove extends past the inner coaming end in the closed position. This groove prevents water from bridging across and entering the interior. Water will instead collect at the groove edge and drop off as an additional measure should any water makes its' way into the housing.
Plan A and Plan B
In spite of previous experience; I hoped that the 3/8" plywood cabin tops would nicely conform to gentle bulkhead curve without requiring additional structure. The resulting saddle shape was not meeting my ambitions. Time for a plan B.
The plan B longitudinal stringers provided sub-marginal improvement in the saddle shape.
In the background can be seen the green forward locker lid part way through the fairing process.
Plan C1 and C2
In the background, aft cabin area, can be seen the main hatch inner coaming. This is the structure the main hatch will slide over.
Plan C1 was to lighten things with arcs 3/4 of an inch thick. This proved way too bendie for success.
Above is an arc in the raw form. The pencil lines show the compound angle that must be measured and cut on each end of every arc. The compound angle is cut on one end and then the saw is set up for the other end. Laying out these cuts resulted in longer pieces than needed, but repeated cuts on one end with the same saw setting allows sneaking up on the correct length to seat the arc as needed. Once seated, marks are made at the cabin lips to position the arc template for finishing with rough arc cutting and arc pattern routing operations.
Jam Rock Murals
Corozal has been spruced up with new murals. I like the ones on the Jam Rock bayside bar.
I like the lady's eyes.
Another Top Side
The newly finished house in December 2016. By 2020 it was starting to look tired and run down.
Newly finished house in June 2020. The house looks larger and more imposing. Why do this you might ask:
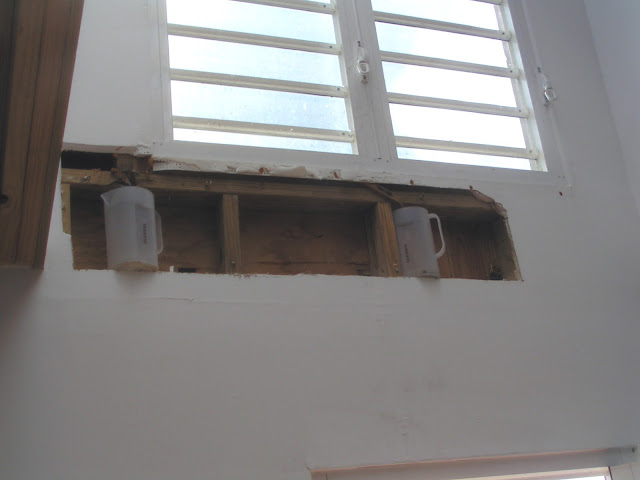
The East facing dormer has leaked since day one. I cut holes below the dormer so the water could be caught as it poured in. The dormer structure was rotting and other roof issues indicated it was time to do something.
The crew has installed a steel ridge beam as the wooden structure is removed. The lumber and roofing materials were donated to a nearby Belizean who lives in a one room house with his wife and two kids. He has a start on a second room expansion and he should be able to finish it with the donated materials.
The new roof is an all steel structure firmly anchored to the new concrete columns as well as steel structures surrounding the former dormer windows. I have confidence it will do much better in a storm than the previous wooden structure. The heavy wooden structure was pushing the walls out and creating a crack in a bathroom corner. At this stage the house is a solar oven. It later received R11 insulation that greatly deadens the deafening sound experienced in the old structure during rain storms.
The finished interior is a bit stark and sterile compared to the old structure, but someday contrasting paint on the partitions it will spark things up.
This stitched together image is a bit distorted, but I'm greatly pleased with the revised deck living space. It now features handrails as well as tongue and groove flooring replacing the splintery gapped floor boards. I'll have to endeavor in finding furnishings to enjoy this space!
I heartily recommend LLP Constructors Ltd. (info.llpconstructors.com) for your construction needs in the Corozal area. The crews are well equipped with good tools and a good work ethic. The director, Peter Maurmann, is a Canadian national of proud German heritage with the German virtue of thoroughness. His Belizean partener, Luis, is the site foreman. He is a person with a stream of good ideas, always thinking ahead to keep the project moving. Both are very pleasant and easy to work with. Thanks Peter and Luis, my expectations were exceeded.


